How To Cut Heat Transfer Vinyl With Cricut: A Beginner's Guide For Crafting Enthusiasts
Are you ready to dive into the world of heat transfer vinyl (HTV) and transform your crafting game? Cutting HTV with a Cricut machine is one of the most exciting ways to personalize clothing, accessories, and home decor. Whether you're a beginner or someone looking to refine their skills, this guide will walk you through every step of the process. From setting up your Cricut machine to applying the finished design, we’ve got you covered.
Imagine creating custom t-shirts, tote bags, or even phone cases with your own unique designs. The possibilities are endless when you know how to cut heat transfer vinyl with Cricut. But let’s face it—getting started can feel overwhelming. That’s why we’ve broken down the entire process into simple steps, so you can focus on unleashing your creativity without the stress.
This article isn’t just about teaching you how to cut HTV; it’s about empowering you to take your crafting projects to the next level. We’ll explore tips, tricks, and best practices that will make your journey smoother and more enjoyable. So grab your Cricut, some HTV, and let’s get started!
Read also:Demi Moores New Bob Haircut A Bold Transformation Thats Turning Heads
Here’s a quick overview of what we’ll cover:
- Understanding Heat Transfer Vinyl and Its Uses
- Setting Up Your Cricut Machine
- Choosing the Right Tools and Materials
- Preparing Your Design in Cricut Design Space
- Steps to Cut Heat Transfer Vinyl
- Tips for Successful Weeding
- Applying HTV to Your Project
- Troubleshooting Common Issues
- Advanced Techniques for Pro Results
- Maintaining Your Cricut Machine
Now, let’s jump into the details!
Understanding Heat Transfer Vinyl: What It Is and Why You Should Use It
Heat transfer vinyl, or HTV, has become a staple in the crafting world for a reason. It’s a type of vinyl that’s designed to be applied to fabric using heat, making it perfect for customizing clothes, bags, and other textiles. Unlike regular vinyl, HTV has a shiny, smooth finish that feels soft to the touch once applied. Plus, it comes in a wide range of colors and finishes, including metallic, glitter, and even glow-in-the-dark options.
So why should you use HTV over other materials? Well, it’s durable, easy to apply, and offers a professional look. Whether you’re creating a one-off project for yourself or starting a small business selling customized items, HTV is versatile enough to handle it all. Just remember, cutting HTV requires precision, and that’s where your Cricut machine comes in handy.
Types of Heat Transfer Vinyl
Not all HTVs are created equal. Depending on your project, you might need a specific type of vinyl. Here’s a quick rundown of the most popular options:
- Standard HTV: Perfect for basic projects and works well on most fabrics.
- Metallic HTV: Adds a luxurious touch with its shiny, metallic finish.
- Glitter HTV: Ideal for adding sparkle to your designs.
- Glow-in-the-Dark HTV: Fun for kids’ projects or nighttime accessories.
- Reflective HTV: Great for safety gear or outdoor projects.
Each type has its own unique properties, so be sure to choose the one that best suits your project needs.
Read also:Brown Hair With Blonde Face Framing Highlights The Ultimate Guide To Elevate Your Look
Setting Up Your Cricut Machine for HTV Cutting
Before you start cutting, it’s essential to set up your Cricut machine properly. This step ensures that your cuts are clean and precise, which is crucial when working with HTV. Here’s how you can prepare your machine:
First things first, make sure your Cricut is updated with the latest software. This ensures compatibility with the latest materials and settings. Next, load the correct blade into your machine. For HTV, you’ll want to use the fine-point blade, which is designed for cutting thin materials like vinyl.
Adjusting Blade Settings
Adjusting the blade settings is key to getting a good cut. Here’s what you need to do:
- Set the material type to "Heat Transfer Vinyl" in Cricut Design Space.
- Adjust the blade depth to the recommended setting for HTV. This is usually around 1-2, depending on the thickness of your vinyl.
- Set the pressure to "Custom" and choose a medium pressure level. Too much pressure can damage the vinyl, while too little won’t cut through it properly.
Once everything is set, you’re ready to move on to the next step.
Choosing the Right Tools and Materials
Having the right tools and materials is crucial for a successful HTV project. Here’s a list of what you’ll need:
- Heat Transfer Vinyl: Choose the type that best suits your project.
- Cricut Machine: Any Cricut model will work, but the Explore Air 2 or Maker models are recommended for their advanced features.
- Cricut Mat: Use a strong grip mat to ensure the vinyl stays in place during cutting.
- Weeding Tool: A good weeding tool will make it easier to remove the excess vinyl from your design.
- Transfer Tape: Essential for transferring your design onto the final surface.
- Heat Press or Iron: Needed to apply the vinyl to your project.
Having all these tools on hand will make your crafting experience smoother and more efficient.
Preparing Your Design in Cricut Design Space
Now that your machine is set up and you have all your materials ready, it’s time to create your design. Cricut Design Space is an intuitive platform that makes designing for HTV projects a breeze. Here’s how you can prepare your design:
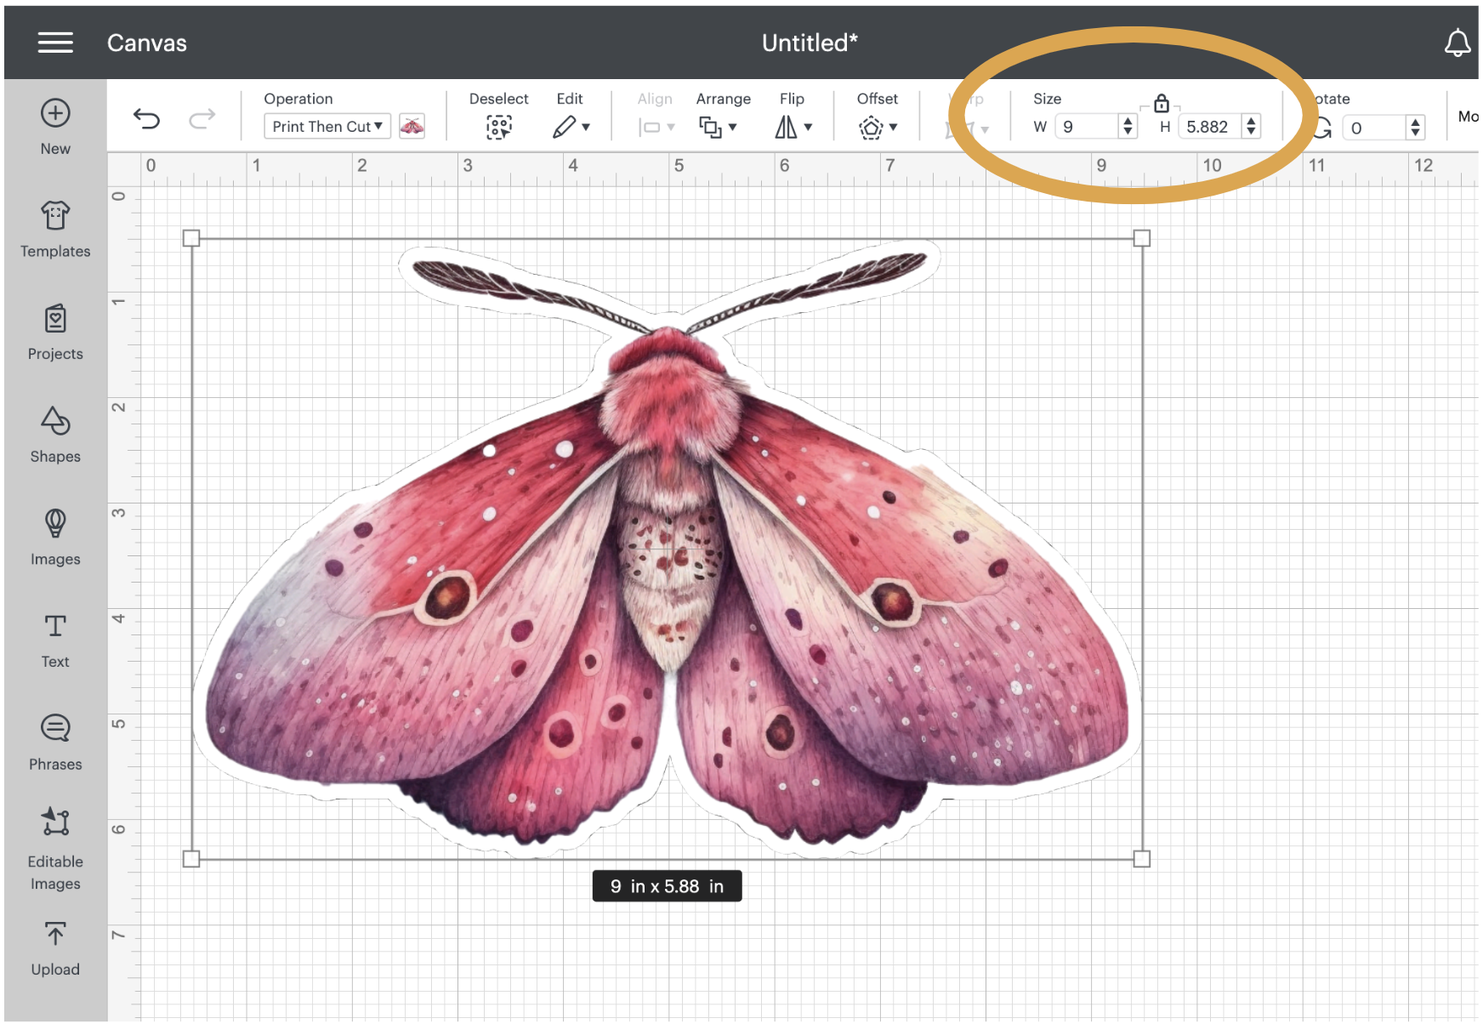
Start by opening Cricut Design Space and selecting "Make It" from the main menu. From there, choose "Upload" to add your own design or browse the library for pre-made images. Once you’ve selected your design, resize it to fit your project. Remember to mirror your design if you’re working with text, as HTV is applied face-down.
Tips for Designing with HTV
Here are a few tips to keep in mind while designing:
- Keep your design simple, especially if you’re new to HTV.
- Avoid using fonts that are too thin or intricate, as they may not cut well.
- Use the alignment tools in Design Space to ensure your design is centered and symmetrical.
Once your design is ready, send it to your Cricut machine for cutting.
Steps to Cut Heat Transfer Vinyl
Cutting HTV with your Cricut machine is straightforward if you follow these steps:
- Load your HTV onto the Cricut mat, shiny side down.
- Insert the mat into your Cricut machine and press "Go" to start the cutting process.
- Once the machine finishes cutting, carefully remove the mat and check your cuts. If they’re not deep enough, adjust the settings and try again.
It’s important to note that different HTV brands may require slightly different settings, so always refer to the manufacturer’s recommendations.
Checking Your Cuts
After cutting, inspect your vinyl to ensure the cuts are clean and complete. If you notice any areas where the vinyl hasn’t been fully cut, adjust the blade depth or pressure and re-cut those sections.
Tips for Successful Weeding
Weeding is the process of removing the excess vinyl from your design, and it’s one of the most critical steps in the HTV process. Here’s how you can weed successfully:
Use a weeding tool to carefully lift the edges of the vinyl you want to remove. Start with the smaller details first, as they’re easier to weed when the larger pieces are still intact. Work slowly and patiently, and don’t be afraid to take breaks if you’re feeling frustrated.
Common Weeding Mistakes to Avoid
Here are a few mistakes to watch out for:
- Pulling too hard on the vinyl, which can cause your design to stretch or tear.
- Weeding too quickly, which can lead to mistakes and wasted material.
- Not using the right tools, such as a good-quality weeding hook or pick.
With practice, weeding will become second nature, and your designs will look cleaner and more professional.
Applying HTV to Your Project
Once your design is weeded, it’s time to apply it to your project. Here’s how you can do it:
- Cover your design with transfer tape, smoothing out any air bubbles as you go.
- Peel off the carrier sheet, leaving only the design on the transfer tape.
- Position your design on the desired surface, ensuring it’s aligned correctly.
- Use a heat press or iron to apply the vinyl according to the manufacturer’s instructions. Typically, this involves pressing the vinyl at a specific temperature for a set amount of time.
After applying the vinyl, let it cool completely before peeling off the transfer tape. You should now have a beautifully applied HTV design!
Troubleshooting Common Issues
Even the best crafters encounter issues from time to time. Here are some common problems and how to fix them:
- Blades Not Cutting Deep Enough: Adjust the blade depth or pressure settings.
- Weeding Too Difficult: Try using a different weeding tool or adjusting the cut settings.
- HTV Not Sticking: Ensure you’re applying the vinyl at the correct temperature and for the recommended time.
By addressing these issues early, you can save time and material in the long run.
Advanced Techniques for Pro Results
If you’re looking to take your HTV projects to the next level, here are a few advanced techniques to try:
- Layering HTV: Create depth and dimension by layering different colors of HTV.
- Using Specialty Films: Experiment with holographic, chrome, or other specialty HTV options.
- Adding Embellishments: Combine HTV with other materials like embroidery or rhinestones for a unique look.
These techniques require more practice and precision, but they can elevate your projects to professional-quality standards.
Maintaining Your Cricut Machine
To keep your Cricut machine running smoothly, regular maintenance is essential. Here’s how you can care for your machine:
- Clean the rollers and blade housing regularly to prevent debris buildup.
- Check the blade for wear and tear, and replace it when necessary.
- Store your machine in a dry, dust-free environment to prolong its lifespan.
A well-maintained machine will provide years of crafting enjoyment, so don’t neglect this important step.
Conclusion: Your Journey with HTV and Cricut Starts Here
Learning how to cut heat transfer vinyl with Cricut opens up a world of creative possibilities. From understanding the different types of HTV to mastering the art of weeding and application, each step brings you closer to creating stunning, personalized designs. Remember, practice makes perfect, so don’t be discouraged if your first few projects don’t turn out exactly as planned.
We encourage you to share your experiences and creations with the crafting community. Leave a comment below or check out our other articles for more crafting inspiration. Happy crafting, and don’t forget to enjoy the journey!
Article Recommendations